
Testing AngularJS Apps End to End Using Protractor
Written by Kamal Sahni
February 13, 2015 — 10 Min Read | 0 Comments
We, at Wingify, have been writing e2e test cases for our A/B testing app for the past 5 months using protractor. Writing e2e scripts is easy but making them work 90% of the times on all browsers makes you go nuts! Sometimes, I feel that the browser is moody, but of course, we have to deal with all its moods and make sure that test cases are robust.
Getting your e2e tests to run smoothly everytime comes with experience. And, learning from my experiences testing our app, here is a post describing them.
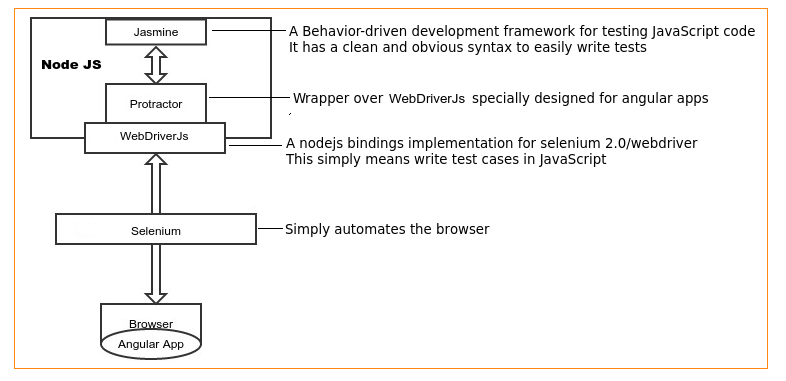
An Overview of Protractor
Protractor is a specially designed wrapper around WebDriverJs to automate e2e testing for angular apps. The following figure gives an overview of the architecture involved for automation and testing :
Setting up protractor and add-ons
For basic setup, go through the Protractor official documentation.
Once the setup is done, you are ready to write and run e2e scripts. Next you need a report of failed and passed test cases along with screenshots. protractor-html-screenshot-reporter , an npm module, provides you with an Html report of the test cases along with screenshots. Set it up as mentioned in npm documentation
Test Scenario and Test Data follow a one-to-many relationship, so we can't hardcode the test data within the code. For example: The same login test script can be used to test the login of different types of users. To make life easy, it is a better option to make use of .xls files (Microsoft Excel, OpenOffice etc) and import data dynamically into the script, while execution.
xlsjs npm module lets us fetch the data from an .xls file and use it in script. Follow the below mentioned steps to set it up :
-
Install xlsjs
npm install xlsjs - Define a JavaScript utility function as :
cellFromXLS = function (cellId) {
    'use strict';
    //Define sheetNumber
    var sheetNumber = 0;
    //Define file Path name
    var fileNamePath = path.join(dirPath, 'data1.xls');
    //NodeJs read file
    var XLS;
    if (typeof require !== 'undefined') {
        XLS = require('xlsjs');
    }
    //Working with workbook
    var workbook = XLS.readFile(fileNamePath);
    var sheetNamelist = workbook.SheetNames;
    var value = workbook.Sheets[sheetNamelist[sheetNumber]][cellId].v;
    return value;
};- Call function as:
var email = cellFromXLS('B1');Test both Angular.js and non-Angular.js based pages
Our use case involves using Protractor for an Angular.js based app, but it works pretty well for non-Angular.js pages as well. Simply set the following flag to true and access the webdriver instance using browser.driver instead of element as shown below :
beforeEach(function() {
browser.ignoreSynchronization = true;
});
For instance, the following code for an angular page:
javascript element(by.css('#elementid').click();
would be written as shown below for non angular page:
browser.driver.findElement(by.css('#elementid')).click();Sounds cool? Now let's dig deeper in the protractor world.
A piece of protractor code
Before we start with the advance functions, let's have a look at a simple login test case, where we verify that the user should be redirected to a welcome page after login.
//Jasmine describe statement : Describes the test
 describe('APP LOGIN::', function() {
    //before Each :  This piece of code executes before all it statement
    beforeEach(function() {
            var ptor = protractor.getInstance();
            ptor.get('https://app.vwo.com');
    });
    //Jasmine it statement : What "it" will do.
    it('Verify that the user is logged in', function() {
	//Delete all cookies
        browser.driver.manage().deleteAllCookies();
	//Enter UserName
        element.all(by.model('username')).get(0).sendKeys('[email protected]');
	//Enter Password
        element(by.model('password')).sendKeys('test');
	//Click Submit button
        element(by.css('.login-form button[type="submit"]')).click();
	//Wait for the current URL to change to welcome
        browser.driver.wait(function() {
            return browser.driver.getCurrentUrl().then(function(url) {
                return (/welcome/).test(url);
            });
        });
	//Jasmine expect statement : compare actual and expected value
	expect(browser.getCurrentUrl()).toEqual('https://app.vwo.com/#/welcome');
    });
    /* Write other it blocks */
});
Let's study the code:
Describe , it and expect are jasmine framework methods to write the tests easily. Read more about them here.
beforeEach function in the code above executes before all it blocks, however, you might not want to execute the code in beforeEach for all it blocks.
Tip: To control its execution you can use a flag variable as shown in the code below.
//use pageLoadedStatus flag
var pageLoadedStatus = false;
beforeEach(function() {
	if (!pageLoadedStatus) {
            //browser.ignoreSynchronization = true;
            var ptor = protractor.getInstance();
            ptor.get('https://app.vwo.com');
            pageLoadedStatus = true;
        }
});
Multiple ways to select elements:
by.css by.model by.repeater by.id by.binding by.xpathInteracting with the DOM:
element: returns a single elementelement.all: returns a collection of elements. Useget(index),first(), andlast()functions to get a single element out of the collection.
Other awesome functions
filter: Similar toget(index),first()andlast()functions,filtertakes a collection of elements and returns a single element. The only difference is that the element can be selected based on the specified condition. This is useful when there is a dynamic/long list of elements having same selector path and you need to get an element using its text or any unique property.
Let's take this example of clicking on a date from a calendar.

All the dates elements have the same selector. Therefore, define a filter function as :
clickDateByText = function (tileText) {
    'use strict';
    //Select all date elements and apply filter function
    element.all(by.css('.dates_selector')).filter(function (elem) {
	//Return the element or elements
        return elem.getText().then(function (text) {
	    //Match the text
            return text === tileText;
        });
    }).then(function (filteredElements) {
	//filteredElements is the list of filtered elements
        filteredElements[0].click();
    });
};
Now to click on date 17, simply call the function as :
clickDateByText(17);each: Use it when the same action has to be taken for all elements having common selector. For example : clearing the list of input fields in a Signup form.
element.all(by.css('form>input')).each(function (inputs) {
    inputs.clear();
});map: Mapping a collection of elements in an array without use of protractormapfunction involves a lot of code to deal with all the proimises one by one. On the contrary, using map function for the same purpose is a piece of cake. Map function iterates through each element found with the locator and then resolves all the promises to return a promise with an array of values. For example : To get the text of all elements (with ng-repeat = 'option in Options') in an array, write the code as :
var optionTexts = element.all(by.repeater('option in Options')).map(function (Options) {
    return Options.getText();
});
optionTexts.then(function (array) {
    console.log(array);
});
Tips and tricks
- Manage Browser logs: There will always be certain scenarios which would not be covered in e2e scripts. Therefore, it is a smart move to always check browser console errors for any unexpected issue in the app. The following piece of code allows you to keep a check at browser logs and fails the test cases if there are any errors :
afterEach(function () {
	browser.manage().logs().get('browser').then(function (browserLog) {
		expect(browserLog.length).toEqual(0);
		if (browserLog.length) {
			console.error('log: ' + JSON.stringify(browserLog));
		}
	});
});-
Combine element statements to move around the dom : Xpath provides an excellent way to move up and down the dom.
// use '..' to select parent of an element
element(by.css('input')).element(by.xpath('..')); // Resulting element will be the parent of input
// use 'following-sibling' to select the sibling
element(by.css('input')).element(by.xpath('following-sibling::span'))
Common UseCase: Error messages are often displayed as a sibling to input or submit types. Therefore, instead of using a different selector path for error message, xpath can be used to pick the sibling.

To verify the error message "invalid URL", simply write the assertion as:
element(by.model('Url')).sendkeys('http://').then(function (ele){
	expect(ele.element(by.xpath('following-sibling::span')).getText()).toEqual('Invalid URL');
});- Never use protractor element statements inside loop: The simple reason is that the webdriverJS (protractor) API is asynchronous. Element statements returns a promise and that promise is in unresolved state while the code below the statements continues to execute. This leads to unpredictable results. Hence, it is advisable to use recursive functions instead of loops.
- Debug the tests using elementexplorer.js: elementexplorer.js lets you test the page interactively. You will find this JS file in node_modules/protractor/bin directory. Start the selenium server and run command:
node elementexplorer https://app.vwo.comBrowser will load the URL and you will see > prompt. Use browser, element and protractor variables to interact with page.
Note: Make sure that the developer tools are closed while running commands in elementexplorer.js prompt, otherwise you will face an unexpected error as "TypeError: Cannot read property 'click' of null"
Maintaining and reusing test cases
Let's admit it, e2e test cases are not easy to be maintained and updated. You have to organize the tests in a way that they can be edited easily. Let's have a glance at Page-Objects, common-files and tests approach that we follow at Wingify, using nodeJS require and exports functions.

- page-objects: Page-objects is a commonly used practice across the industry while writing e2e tests. It enables you to write clean tests by listing all the information about the elements in a page-object file. This means that you only need to change the page object file, in case of any change in template of app.
Our Application has more than 50 screens. Therefore we list all the page-objects i.e. dom elements of each screen in a seprate JS file. Take a look at login screen page-object file :
/*File Name : loginPage.js*/
var loginPage = function () {
    'use strict';
    this.userName = element(by.model('username')).get(0);
    this.password = element(by.model('password'));
    this.submitButton = element(by.css('.login-form button[type="submit"]'));
    //******************** functions *******************
    this.setUserName = function (username) {
        this.userName.clear();
        this.userName.sendKeys(username);
    };
    this.clickSubmit = function () {
        this.submitButton.click();
    };
};
module.exports = {
    log: new loginPage()
};- common-module: The idea is to divide the entire e2e scenario in small reusable functions in a way that these functions can be used in other e2e scenarios as well. These reusable functions can be grouped in different files for maintainblity. The login and logout module is used in many e2e scenarios. So, both can be clubbed in a file as shown below :
/*File Name : LoginOut.js*/
var loginPage = require('loginPage.js'),
    userName = '[email protected]',
    pass = '12345';

exports.login = function () {
    //delete all cookies
    browser.driver.manage().deleteAllCookies();
    loginPage.log.setUserName(userName);
    loginPage.log.setPassword(pass);
    loginPage.log.clickSubmit();
    browser.driver.wait(function () {
        return browser.driver.getCurrentUrl().then(function (url) {
            return (/welcome/).test(url);
        });
    });
    browser.manage().getCookie('login').then(function (cookie) {
        expect(cookie.value).toBeDefined();
        expect(cookie.value).not.toEqual('');
    });
};

exports.logout = function () {
    //logout script
};- e2e-scripts: Include all the common-module functions to write the complete e2e-script as shown below :
/*File Name : CreateNewUserE2E.js*/
var loginMod = require('loginOut.js');
describe('Create a new user in the account and verify', function () {
    /*Load Test Url */
    'use strict';
    it('Verify login', function () {
        loginMod.login();
    });
    /* Rest of the modules to verify user creation */
    it('Verify logout', function () {
        loginMod.logout();
    });
};
To conclude
- Take an extra step to write test cases in a way that they can be edited and maintained with ease.
- Create a modular approach keeping scalability in mind.
- Dive deep in the protractor world, use protractor's awesome functions and have fun!!
Hope this post was a good enough reference to help you write end-to-end tests in a better way. If things might be unclear, or you have any questions, let us know via comments.
Links & references
- Protractor API: http://angular.github.io/protractor/#/api
- npm xlsjs: https://www.npmjs.com/package/xlsjs
- ng-learn: http://ng-learn.org/2014/02/ProtractorTestingWithAngularAndNonAngular_Sites/